OSPF Verification
The first command we're going to look at is the 'show ip route'. We already know that this displays the routing table, but let's see how the routing table has changed now that OSPF is installed.
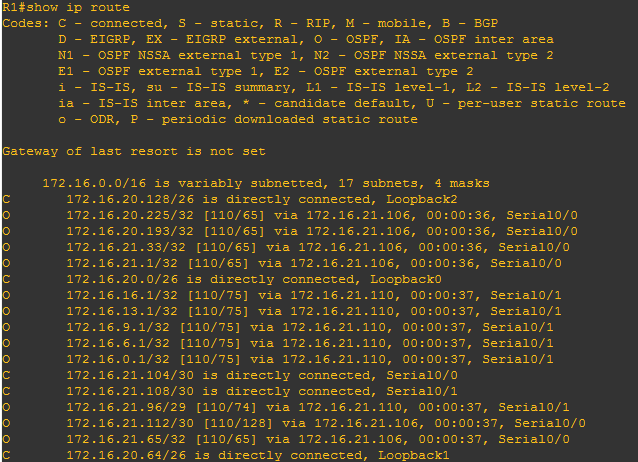
The above image is the routing table for router 1. Notice that the codes next to the routes have changed from R to O indicating that they are OSPF routes. Another thing to notice is that the numbers in the brackets have changed. The first number indicates the default AD of OSPF which is 110. The next number is OSPF metric which we haven't discussed yet.
OSPF uses a metric of cost. Cost is determined based on the bandwidth of the link. As you can tell OSPF uses a much more advanced approach than RIP does to calculate it's metric. OSPF actually takes into consideration the speed of the link is before it sends packets.
Other than that nothing else has really changed in our routing table, we're still routing for the same networks.
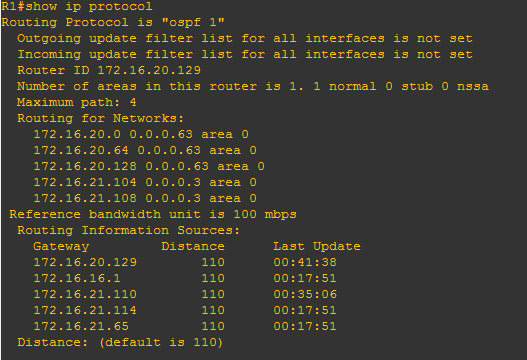
The above image displays the output of the 'show ip protocol' command on router 1. This shows us what routes OSPF is routing for as well as the router ID for router 1. Remember this is a key piece of information that can determine a DR and BDR election. We see that the router ID is 172.16.20.129, but if we look at our network we see that 172.16.21.129 is the highest IP on the router, why is the router ID the way it is? Because loopback interfaces take priority over all other interfaces in the election process.
In the beginning of this section we discussed the topology and neighbor databases, now we're going to actually view them and see what information we can gather.
In the beginning of this section we discussed the topology and neighbor databases, now we're going to actually view them and see what information we can gather.
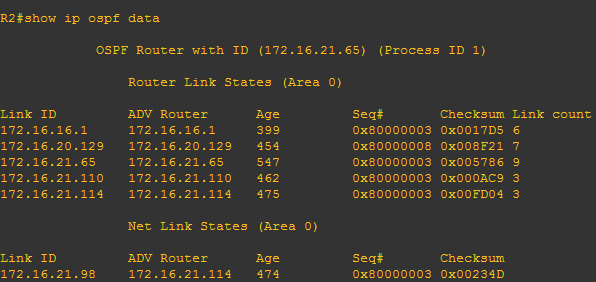
The above image shows the topology table of router 1. At the top of the output we see our router ID again, as well as the process ID for this topology table. Further down we see the link ID and the advertising router for each router that router 1 has received a hello from. We see 5 total routers here which is exactly what we should be seeing.

The above image shows the output of the neighbor database. This shows that router 1 has formed 2 neighbors. One with the router ID 172.16.21.110, and one with the router ID 172.16.21.65. These happen to be router's 2 and 3. The neighbor table lists each neighbor as FULL. This is where you would find your DR/BDR information, however since R1 only has point to point links there was no election for it. The only election in the network happened between router 3, 4, and 5. Let's take a look at router 3's neighbor database.

From the output we see that router 3 has 3 neighbors. The first entry has a state of FULL/DROTHER , this indicates that the router is not the DR or BDR. It's kind of odd how Cisco does this, if a neighbor is neither DR or BDR then it is designated as 'DROTHER' or Designated Router Other. The next entry says FULL/DR indicating that this router is the DR for the multiaccess segment. The next entry is for the point to point link and as such it does not participate in the election process.
Before we go any further I'm going to make a quick change to our routers. I'm going to add a loopback interface to each router as follows -
I'm doing this so that the router ID will change on reach router and make them easily identifiable. After adding the loopback interfaces I'll have to restart the routers so that they assume the new IDs.
Now if we look at the neighbor database on router 3 it's much easier to determine who's who.
Before we go any further I'm going to make a quick change to our routers. I'm going to add a loopback interface to each router as follows -
- R1 Loopback - 200.1.1.1
- R2 Loopback - 200.2.2.2
- R3 Loopback - 200.3.3.3
- R4 Loopback - 200.4.4.4
- R5 Loopback - 200.5.5.5
I'm doing this so that the router ID will change on reach router and make them easily identifiable. After adding the loopback interfaces I'll have to restart the routers so that they assume the new IDs.
Now if we look at the neighbor database on router 3 it's much easier to determine who's who.

We can easily see that router 4 is now the BDR and router 5 is the DR. The link to router 1 is the point to point link. The next command expands on the 'show ip ospf neighbor' command and includes a lot more details -
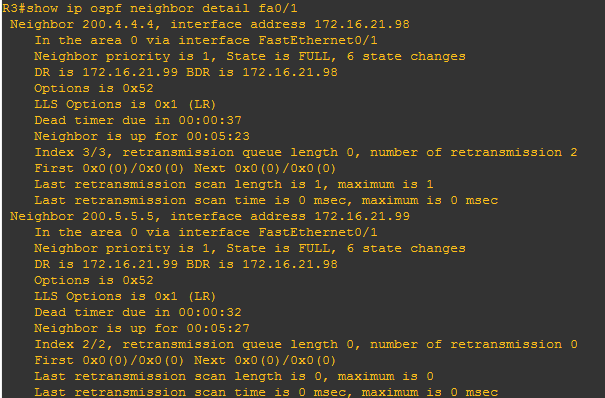
The output shows just information for the segment connected to fa0/1. It displays information on each neighbor learned on that link. It can provide IP addresses, state of the OSPF neighborship, DR and BDR status, as well as a wealth of other information.
The next command is 'show ip ospf interface fa0/0' command. This will display detailed information about OSPF on an interface
The next command is 'show ip ospf interface fa0/0' command. This will display detailed information about OSPF on an interface
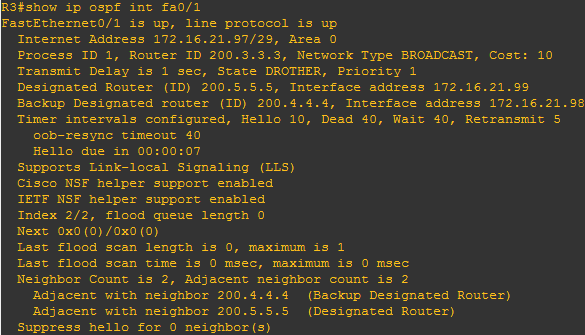
This command displays output about specific to this link. It gives up the status of the link as well as the IP address, router ID, and DR/BDR information. Another useful piece of information found here is the OSPF timers. The hello and dead timers must match for routers to become OSPF neighbors, so if you're having issue with routers not forming neighborship always check your timers. You can also find information about adjacent neighbors on the link.
As you can see there are quiet a few show commands in the OSPF arsenal. Learn to use these commands well, as there is information in each one of them that is vital for troubleshooting and maintaining a network. Next we will play around with the OSPF network and find out how it can routes traffic through the network.
As you can see there are quiet a few show commands in the OSPF arsenal. Learn to use these commands well, as there is information in each one of them that is vital for troubleshooting and maintaining a network. Next we will play around with the OSPF network and find out how it can routes traffic through the network.
