Routing Protocols
RIPv1 is the easiest routing protocol to understand. It has a simple metric that makes it easy to determine how RIP will route data. Remember that RIP is a distance vector routing protocol and will broadcast out its entire routing table every 30 seconds to update neighbors about routes.
Routing Information Protocol (RIPv1)
RIPv1 is a classful distance vector routing protocol. Since RIPv1 is considered classful, no subnet information is sent with routing updates. Due to the lack of subnet information in the routing update it's required that each subnet use the same subnet mask. RIP uses hop count as a metric which is its way of determining the best path to a destination. It has a maximum hop count of 15, so if RIP traffic exceeds 15 hop counts it is considered unreachable. Let's take a look at a sample network and go over some of these terms.
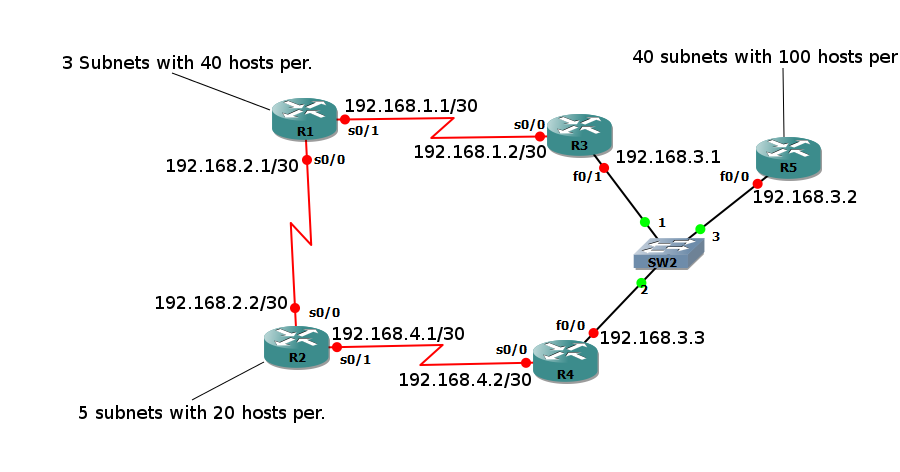
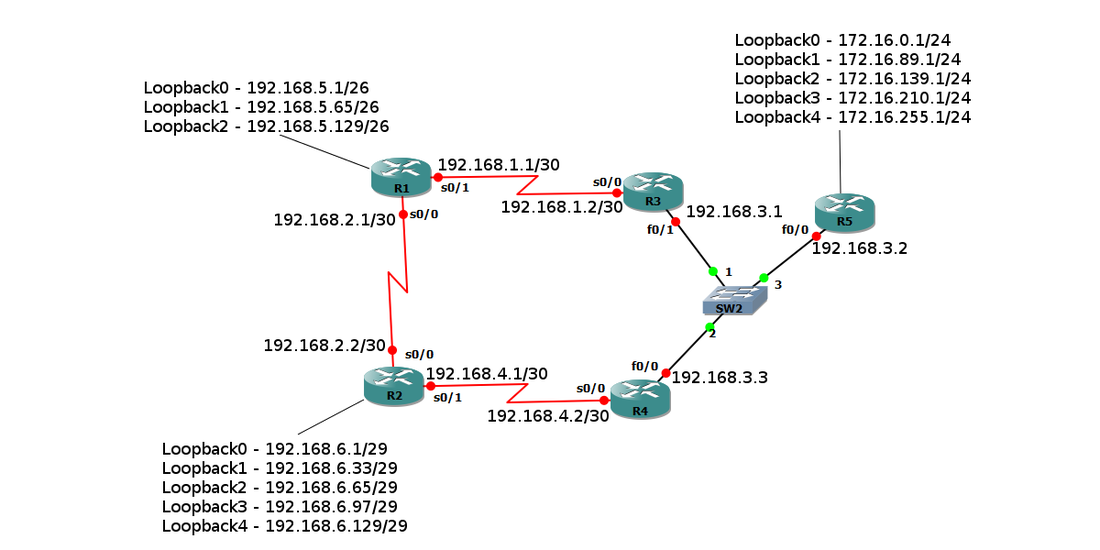
The following network is what we are going to use to discuss RIP and the other routing protocols, so after the initial setup we can focus on how the routing protocols operate.
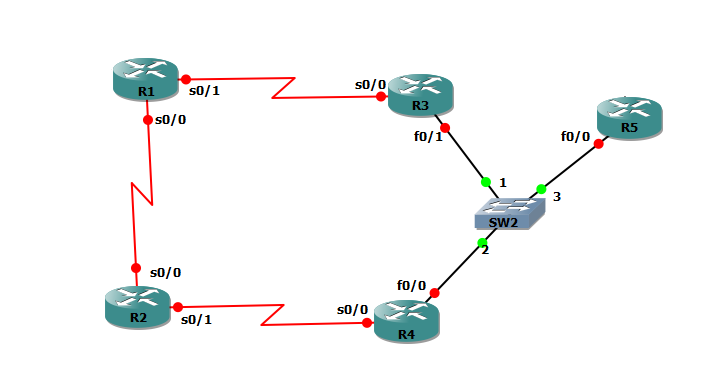
The first thing we have to do is assign IP addresses to our network. We're going to use several class C network address in our internetwork. We're going to use a point to point subnet on the serial links, and just use the default subnet mask for the rest. We'll use the networks 192.168.1.0-192.168.4.0. The following image depicts how we will configure our addressing on the network -

The image above shows how each router interface should be configured. The following image is the configuration for router 1.
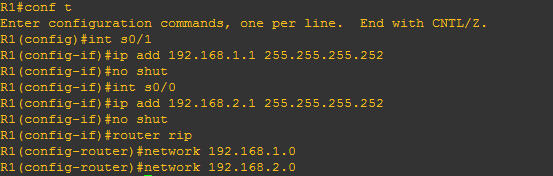
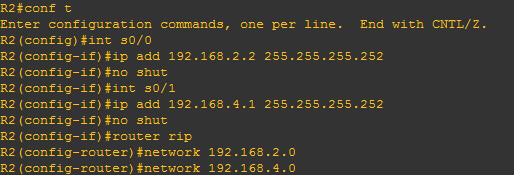
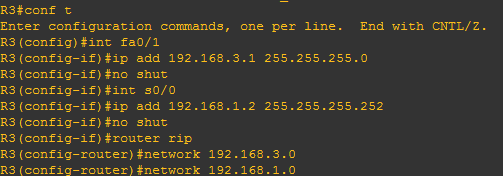
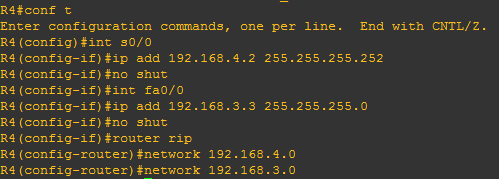
We configure s0/0 and s0/1 with the 255.255.255.252 mask because it provides a subnet with 2 hosts, which is perfect for a our point to point WAN links. Then all we have to do is configure RIP to route for the 192.168.1.0 and 192.168.2.0 networks. Lets look at the other router configurations -

|
|
As you can see the basic configuration for the routers is pretty simple and doesn't require much input. From here each router should be able to ping the other routers.
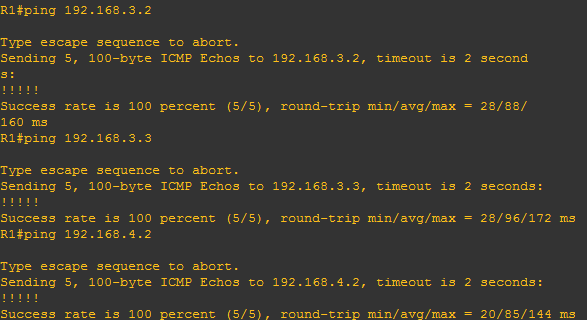
You can see in the above image I successfully pinged several of my neighbors, you should ensure that you have full connectivity at this point. The next thing we will do is add our LANs onto router 1, 2, and 5. Lets do our subnetting and figure out what subnet mask each LAN needs.
Let's start with the LAN connected to router 1. We see we need 3 subnets with at least 40 hosts per subnet. We can use a class C address to accomplish this. Lets start with 192.168.5.0/24 and add 2 bits to the subnet mask giving us 255.255.255.192. Lets plug in our formula and figure out how many subnets we create and how many hosts each subnet can hold. We added 2 subnet bits so we do 2 to the 2nd power = 4, so we have 4 subnets. Lets figure out hosts, we have 6 0's left in our subnet mask, so 2 to the 6th power - 2 = 62. So we created 4 subnets that hold 62 hosts per. This is perfect for our requirements.
In order to simulate these subnets on router 1 I'm going to add loopback interfaces. I'll create 3 loopback interfaces to simulate the 3 subnets that are required.
In order to simulate these subnets on router 1 I'm going to add loopback interfaces. I'll create 3 loopback interfaces to simulate the 3 subnets that are required.
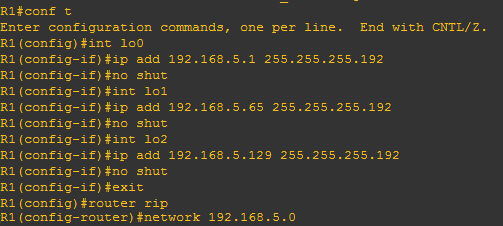
Notice at the end that I added the loopback interfaces to the RIP configuration. Now let's configure router 2. Instead of plugging in our formulas, lets just take a look a the subnetting chart below and see what mask we can use for router 2's LAN.
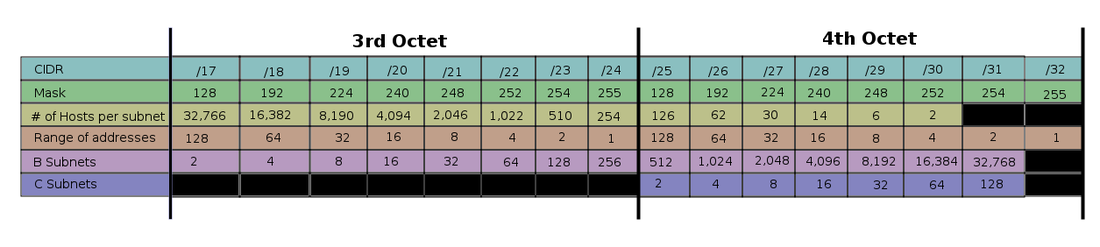
We need 5 subnets with 20 hosts per, looking at the chart we see that a /27 mask gives us 8 subnets with 30 hosts per. So lets go ahead and create 5 loopback interfaces and configure them with the 5 subnets.
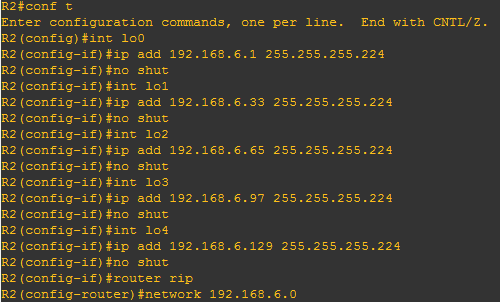
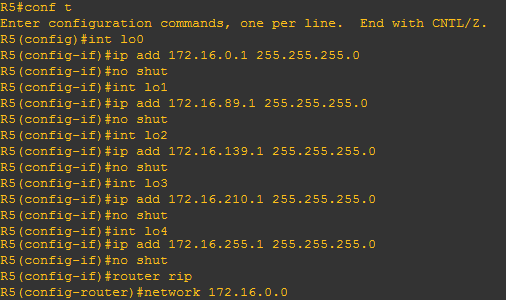
Router 2 now has 5 loopback interfaces configured with the first IP address of the first 5 subnets that we created. The last LAN we have to create is connected to router 5. This LAN requires 40 subnets with 100 hosts per. If we look at the subnetting chart we see that none of the class C masks will work, but several class B masks will provide the needed subnets and hosts. We will go ahead and use a /24 mask on a class B address as it provides room for expansion in both subnets and hosts. Instead of creating 40 loopback interfaces I'm only going to create 5, but I'm going to create them in certain subnets. If we look at our mask we see that we get 256 subnets, I'm going to create loopbacks in the 1st, 90th, 140th, 211th, and the last subnet. Lets go ahead and figure out what the network address is for these subnets.
We'll start with the IP address 172.16.0.0/24, this is also the network address for the first subnet, so that's one down. If we look at our subnetting chart we see that our range is 1, which makes this a really simple process. So if our range is 1 then we know our 90th subnet is 172.16.89.0, the 140th is 172.16.139.0, and so on. Lets go ahead and configure our loopback interfaces -
We'll start with the IP address 172.16.0.0/24, this is also the network address for the first subnet, so that's one down. If we look at our subnetting chart we see that our range is 1, which makes this a really simple process. So if our range is 1 then we know our 90th subnet is 172.16.89.0, the 140th is 172.16.139.0, and so on. Lets go ahead and configure our loopback interfaces -
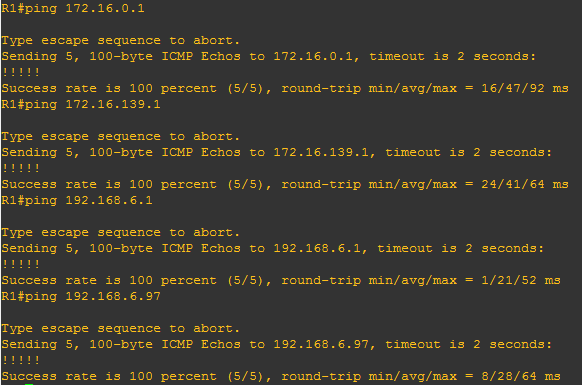
At this point we have created our loopback interfaces to simulate our hosts, and we configure RIP to route these networks. Now we should be able to ping our loopback interfaces. Lets go to router 1 and attempt to ping the LANs on router 2 and 5. Lets look at our map.
So from router 1 our pings to the loopbacks on router 2 and 5 should be successful. Here are the results of router 1 pinging several loopback interfaces on router 2 and 5 -
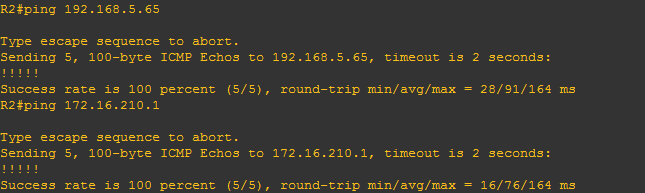
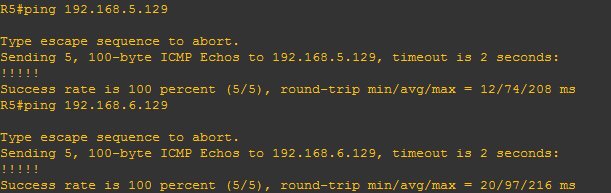
And here are the results of router 2 and 5's pings -
So now that we have the entire network operational, lets talk about how RIP is running the network.
