Variable Length Subnet Masks
In the previous section we learned how to do basic subnetting, now we're going to learn how to create Variable Length Subnet Masks, or VLSMs. VLSM refers to the creation of subnets with subnet masks of varying length. VLSMs are used to conserve address space in a network. Before we move on to an example there are a few concepts that need to be explained.
Classful vs classless routing
First off you need to know the difference between classful and classless networking. When we refer to classful routing it means that routers are running protocols such as RIPv1 that do not send subnet information. In these networks the router will assume that all interfaces within a certain class will have the same subnet mask. Classless routing refers to the use of routing protocols that support the advertising of subnet information. Routers running protocols that are classless allow interfaces in the same class to have different subnet masks.
Classless inter-domain routing
There's one other thing we need to talk about before we get into working with VLSM and that is classless inter-domain routing or CIDR, which you might remember from subnetting chart in the previous sections. CIDR is another way for us to represent a subnet mask. For example if we have a subnet mask of 255.255.255.0 another way of representing it would be by counting the number of bits turned on, or 1s, in the binary mask. We know from the subnetting section that every octet with a 255 means there's eight 1’s there, so we count the 1’s in the entire mask and we get twenty-four 1’s, so in CIDR notation 255.255.255.0 would be /24 which simply means there are 24 1’s in the subnet mask.
Utilizing VLSM with a Class C address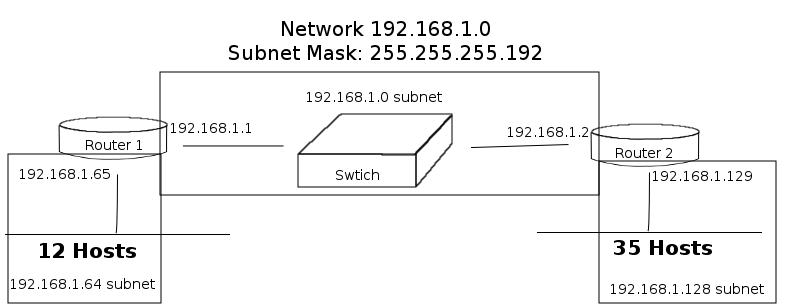
In the above network we see 3 subnets each supporting 62 hosts, however 62 hosts is way too many for the subnet connected to router 1 that only has 12 hosts and requires 13 addresses and the subnet connecting the 2 routers only needs 2 address. So we actually have 60 extra IP addresses in the subnet connecting the routers. In order to make our addressing more efficient we will create different subnet masks for each link.
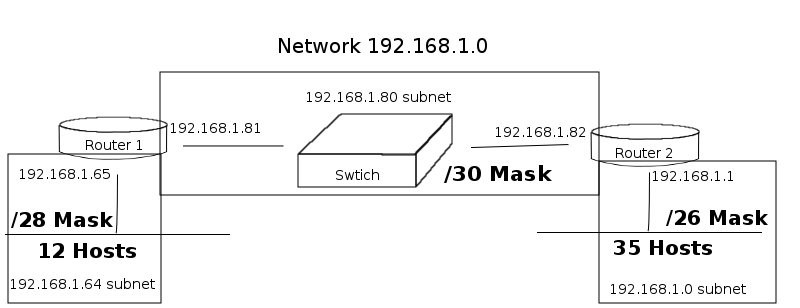
Our first subnet is already created, it's the subnet connected to router 2 with a /26 mask. In order to create our second subnet we have to figure out the range of addresses the mask provides so that we know where the first subnet ( the /26 subnet ) will end. 256 - 192 = 64 addresses long. Our first subnet will begin at 192.168.1.0 and end at 192.168.1.63. Now we know our second subnet begins are 192.168.1.64. Lets create the subnet connected to router 1. We need IP addresses for 12 hosts and the routers interface. So looking at our nifty subnet chart we see - |
|
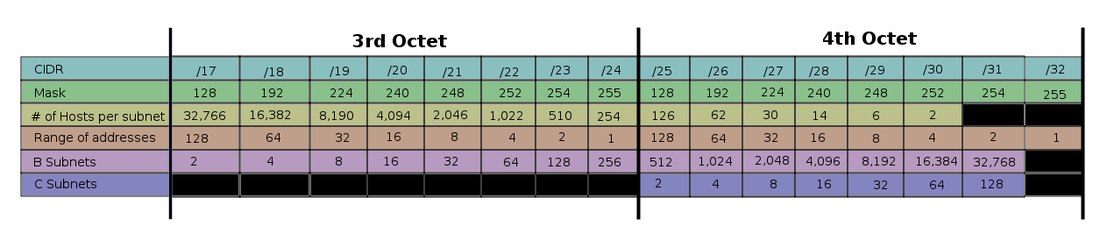
The /28 mask will provide 14 host addresses, which is only 1 more than whats required. This is a much more efficient mask for this subnet. Going back to the chart we see that this mask gives us a range of addresses 16 long. So our second subnet will begin right after the first subnet at 192.168.1.64 and it will end with 192.1168.1.79.
The last thing to do is find our mask for the 3rd subnet. We only need support for 2 host addresses and looking at the subnet chart we find that /30 will give us exactly 2 host addresses, this also gives us a range of 4. So the 3rd subnet will begin right after the second at 192.168.1.80 and end at 192.168.1.83.
The last thing to do is find our mask for the 3rd subnet. We only need support for 2 host addresses and looking at the subnet chart we find that /30 will give us exactly 2 host addresses, this also gives us a range of 4. So the 3rd subnet will begin right after the second at 192.168.1.80 and end at 192.168.1.83.
As you can see VLSM can make our network addressing much more efficient. There are some design aspects of VLSM that can get confusing so let's go over them on the next page.
Previous Section: Subnettin Examples VLSM Design
Previous Section: Subnettin Examples VLSM Design
