Testing our Network
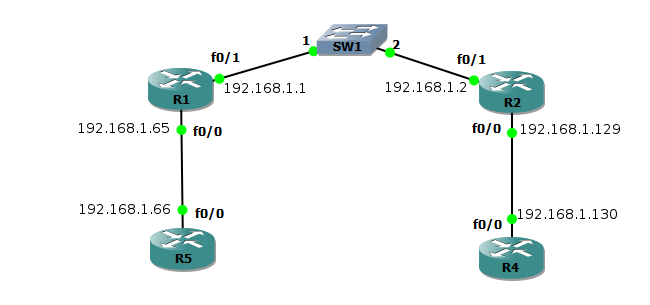
Lets go ahead and test the connectivity of our network using the ping utility. Ping actually stands for Packet Internet Groper and is used to test reachability of a host on a network. Ping works by sending a ICMP echo request to the target host and waits for a ICMP response. Lets take another look at the GNS3 network we're working with.
Lets connect to router 2 this time and make sure we can ping the 192.168.1.64 network connected to router 1. When we connect we should issue the ping command at the privileged mode. We will ping the f0/0 interface on router 5, this is the router simulating a host on our network.

So what happened? We had a success rate of 0 percent. So there's definitely something wrong with our connection. Just so you know I went ahead and introduced a few errors into the configuration for troubleshooting purposes, the configuration we did previously in this section does not contain these errors.
So lets try to figure out whats wrong with our network. The first command we will start with is a nice quick command used to check our interfaces, the 'show ip interface brief' command.
So lets try to figure out whats wrong with our network. The first command we will start with is a nice quick command used to check our interfaces, the 'show ip interface brief' command.

Looking at the output we see that the FastEthernet0/0 is up on layers 1 and 2, however we see FastEthernet0/1 as administratively down at layer 1 and down at layer 2. So there's a problem right there, and there's only 1 reason for an interface to be administratively down and that's because the 'no shutdown' was not entered into the interfaces config. So lets go in and change the interface to up.

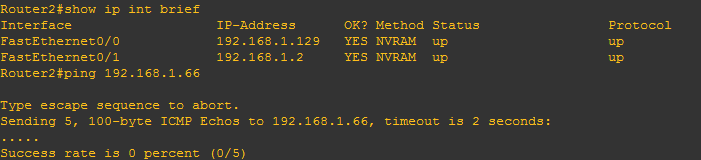
We brought up the interface and everything checks out in the 'show ip int brief' command, but when we try to ping the host we still don't get any success. Lets check our routing table to make sure we have an entry for the 192.168.1.64 network.
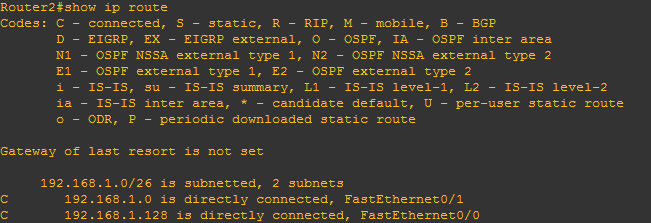
Well there's another problem. We only have entries for 2 subnets in our routing table, the 192.168.1.64 subnet is not present. The entry for this route should have been added by RIP, so maybe there's an issue with out RIP configuration. We're going to look at a new show command here, the 'show ip protocols' command
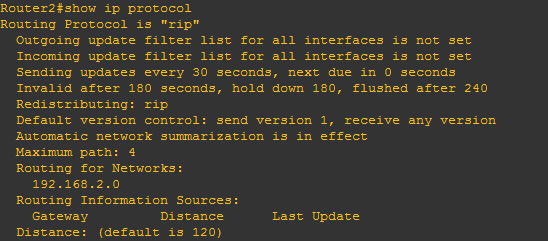
We see that the routing protocol running is RIP so rip has been started. Looking through the output we see that RIP is routing for networks 192.168.2.0. That doesn't seem right, if we look at our network we see that we're using the 192.168.1.0 network, so there must have been an error when entering the network address. No problem, we can simple go into the RIP config and change the network address. I should note that we could have found this information in the running configuration as well.
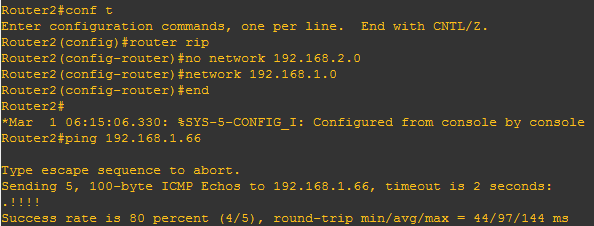
The first thing we do is go into the RIP configuration and take off the 192.168.2.0 network by issuing the 'no network 192.168.2.0' command. Then we enter in the correct network address and we're done. If we ping router 5 now we see an 80% success rate. One of the ICMP echo requests was not replied to, this is probably because RIP was still exchanging routes and router 2 didn't have the route yet. So we have connectivity to the remote network connected to router 1.
Now our network is functioning and we can ping across it. The last thing we will talk about is saving the running-config. If we were to restart the routers they would lose all the configurations we already did. The command to accomplish this is 'copy running-config startup-config' or you can use the short version 'copy run start'. This will copy the running configuration from RAM and rename is as startup-config and save it to NVRAM.
Now our network is functioning and we can ping across it. The last thing we will talk about is saving the running-config. If we were to restart the routers they would lose all the configurations we already did. The command to accomplish this is 'copy running-config startup-config' or you can use the short version 'copy run start'. This will copy the running configuration from RAM and rename is as startup-config and save it to NVRAM.

As you can see this command is entered in privileged mode. You can specify a different file name for the configuration file which is useful for making backups. Now our networks up and running and when the network gets restarted everything should come back up just fine. That completes the configuration for this network.
