RIPv2 Configuration
The process of converting routers from RIPv1 to RIPv2 is extremely simple.
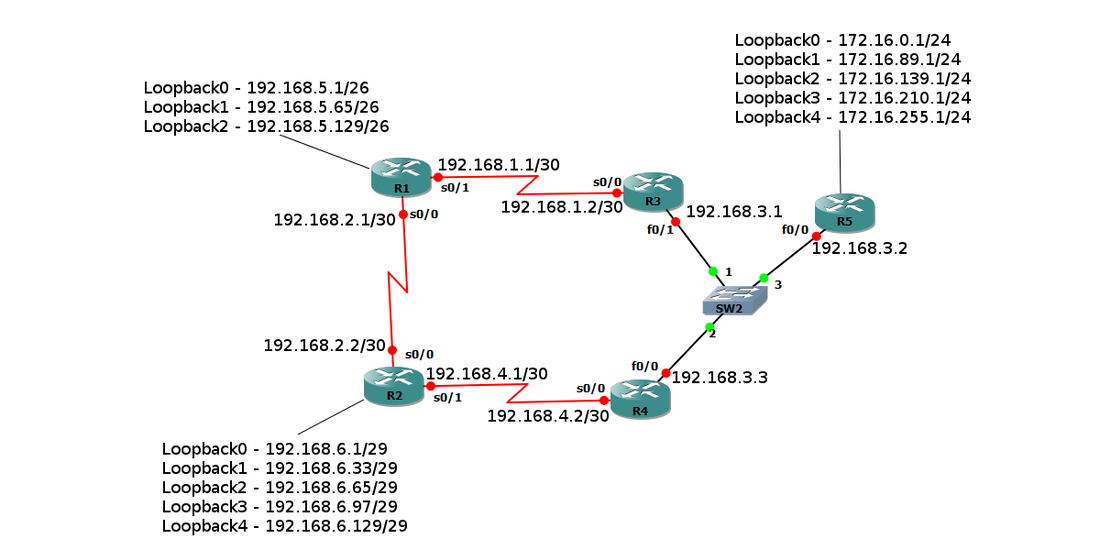
Let's go ahead and log back into our routers from the last section and convert them to RIPv2.

That's all you have to do to start running RIPv2. Simply go into RIP configuration and type the command 'version 2' on each router and they will all be running RIPv2. The first thing we're going to do now is change the IP addresses. We're going to take a class B address and utilize VLSMs to make a much more efficient network.
|
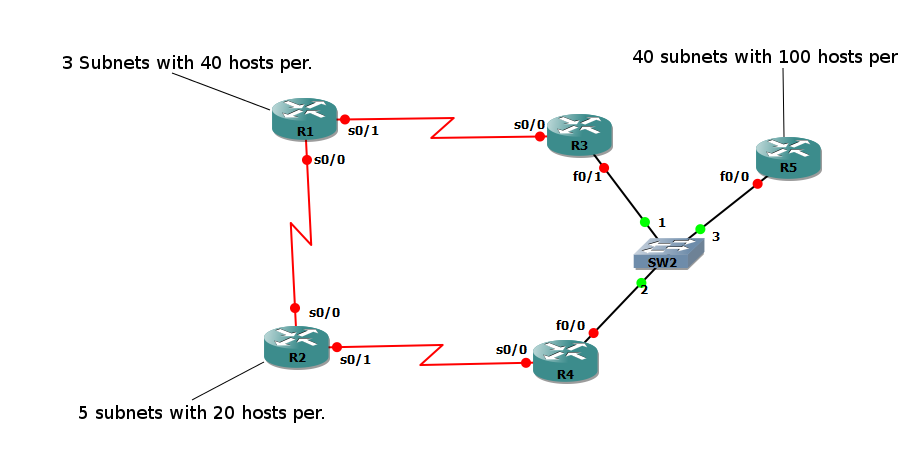
Let's design our network starting with the 172.16.0.0 network address. We'll need subnets for the LAN connections on router 1, 2, and 5, as well as subnets for each point to point interface, and a subnet for the shared LAN segment connected to the switch. Let's start by addressing the LAN connection on router 5. This requires 40 subnets with 100 hosts per, if we look at the subnetting chart below we find that a /25 mask will work. The first step is to create the 40 subnets we need. Looking at the chart we see that the /25 mask has a range of 128. This is a lot of addresses, but here they are -
172.16.0.0 172.16.0.128 172.16.1.0 172.16.1.128 172.16.2.0 172.16.2.128 172.16.3.0 172.16.3.128 172.16.4.0 172.16.4.128 172.16.5.0 172.16.5.128 172.16.6.0 172.16.6.128 172.16.7.0 172.16.7.128 172.16.8.0 172.16.8.128 172.16.9.0 172.16.9.128 172.16.10.0 172.16.10.128 172.16.11.0 172.16.11.128 172.16.12.0 172.16.12.128 172.16.13.0 172.16.13.128 172.16.14.0 172.16.14.128 172.16.15.0 172.16.15.128 172.16.16.0 172.16.16.128 172.16.17.0 172.16.17.128 172.16.18.0 172.16.18.128 172.16.19.0 172.16.19.128 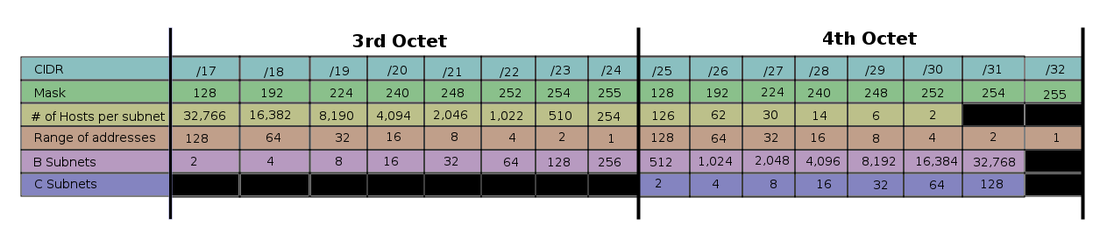
|
|
Ok so our first 40 subnets are completed and our next subnet will begin at 172.16.20.0. Now let's create the subnets for the LAN connected to router 1. We'll need 3 subnets holding at least 40 hosts and from the chart we see that a /26 mask will provide enough hosts. This mask has a range of 64, so let's create our subnets -
172.16.20.0/26
172.16.20.64/26
172.16.20.128/26
Let's do the same thing for the LAN connected to router 2. We need 5 subnets with 20 hosts each. A /27 mask will provide enough hosts. Our 5 subnets will be -
172.16.20.192/27
172.16.20.224/27
172.16.21.0/27
172.16.21.32/27
172.16.21.64/27
That takes care of our host subnets connecting to router 1, 2, and 5. Now lets create a subnet for the shared LAN segment connecting routers 3, 4, and 5. We need 3 addresses for this subnet. Taking another look at the chart we see a /29 mask will work. Our subnet for the LAN segment is-
172.16.21.96/29
The last thing we have to do is create our 3 subnets for our point to point links. Point to point links get a /30 mask, so our subnets are -
172.16.21.104/30
172.16.21.108/30
172.16.21.112/30
Whew, that was a lot of work but broken down it's easy to accomplish. All we have to do now is apply IP addresses in the correct subnets to our routers. If you're following along with the LAB in GNS3, we're going to simply apply the 1st, 13th, 19th, 27th, and 33rd subnets. Before we configure the routers, let's take a look at our new network diagram.
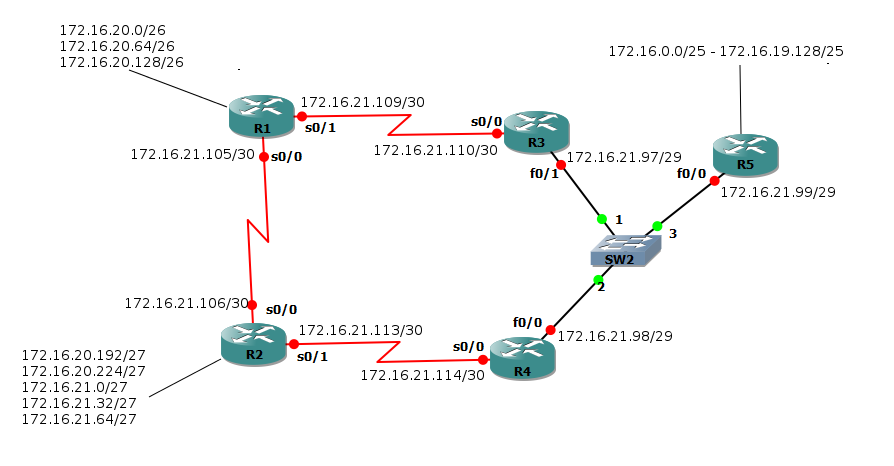
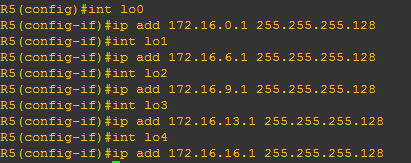
This new diagram reflects our IP changes for VLSM. Now let's configure each router. We'll start with router 5 and configure the 5 loopback interfaces.
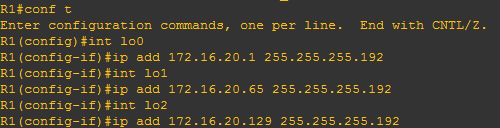
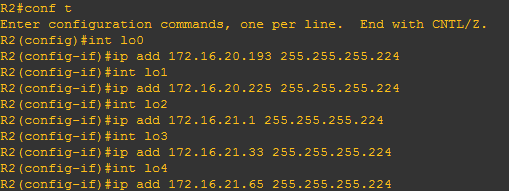
Good, now let's do the same for the LANs connected to router 1 and 2.
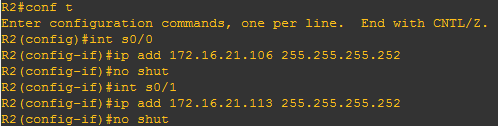
Now all we have to do is go configure the point to point interfaces, and the shared LAN segment. We'll start by configuring the fastethernet interfaces on routers 3, 4, and 5.


Now let's configure our point to point interaces.


That takes care of all of the interface configurations. The last step is to go into each router and configure RIP to route for the 172.16.0.0 network.

Once the 172.16.0.0 network has been added to every routers RIP configuration our network will be fully functional. Our network now routes with RIPv2 and uses VLSM. The next step is to add authentication to the network.
