OSPF Configuration
The previous network we created can be found in our GNS3 labs here. Let's take a look at our network diagram.
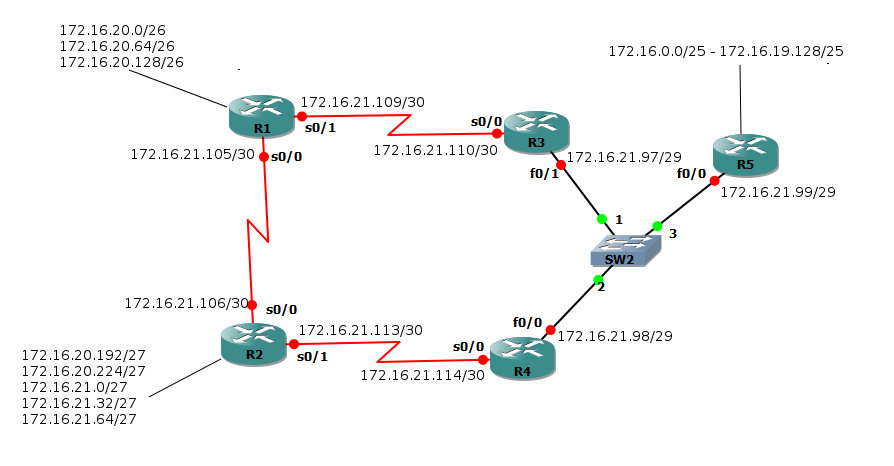
Everything is already addressed so all we have to do is configure OSPF to router for the proper networks. There are several ways we can do this, the easiest is just to tell the routers to route for the 172.16.0.0 network with a wildcard mask of 0.0.255.255. This means that each router will route for any subnet that falls into the last 2 octets, which all of ours do. We could get more precise and enter each actual subnet with the proper wildcard mask, there isn't any real point in this network to do this, but we will on a few of the subnets just to get a good grasp of wildcard masks.
The first router we'll configure is router 1. We're going to go ahead and configure each subnet connected to router 1 with the most specific wildcard mask we can. Let's look at the configuration -
The first router we'll configure is router 1. We're going to go ahead and configure each subnet connected to router 1 with the most specific wildcard mask we can. Let's look at the configuration -
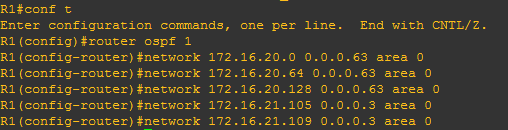
The first command we entered in global config mode was 'router ospf 1' the 1 in this command is the process ID. The process ID is a locally significant number that helps OSPF keep track of separate instances of OSPF running on a single router. The process ID does NOT have to be the same on every router.
The next thing we see is our network commands. The first 3 are for the loopback interfaces and the last 2 are the point to point interfaces. Each network is going to be in area 0 since we're focused strictly on single area OSPF.
We'll configure router 2 and the rest of the routers with the following commands -

Notice as soon as I enter the network command I receive a prompt telling me that there was an OSPF adjacency change in process 1. It says that a neighbor with an IP address of 172.16.20.129 connected to router 2's serial0/0 interface went from LOADING to FULL. This means that router 2 and the router connected to router 2 on the serial0/0 interface have created a full neighborship and are exchanging routes.
OSPF routes can go through a few different stages -
Now that our network is configured with OSPF let's move on to the show commands and see how we can verify our configuration
OSPF routes can go through a few different stages -
- Down - This state means that no hello packets have been received from a neighbor. The router can still send hello packets in this state.
- Init - This state tells us that the router has received a hello packet from a neighbor but the receivers router ID was not included with the hello packet. The packet should list the receiving router's router ID to acknowledge that it received a valid hello packet.
- 2-way - This state indicates that each router has received a hello packet from one another but have not achieved full adjacency. In multiaccess networks with 3 or more routers a router will only become fully adjacent with the DR and BDR, every other router will have a 2-way designation.
- Exstart - After the DR and BDR election the routers begin to set up the exchange of routes between the routers and the DR.
- Exchange - In this state the OSPF routers exchange their database information.
- Loading - After the routers exchange all of their database info they begin to exchange Link-State updates and exchange link information.
- Full - This state means that the OSPF are has become fully converged. All the routers have a full topology database of the area.
Now that our network is configured with OSPF let's move on to the show commands and see how we can verify our configuration
